Outputting 3D Formats

Output of 3D formats is always dependant on the contents of the current 3D view. If a 3D view is not active then no data will be exported.
By means of the visibilities and/or the visible categories of the 3D view which is to be exported, it is possible to control whether the complete view or only certain parts of it should be exported as a 3D object. Thus, it not only to possible to save individual results, e,g a roof or a staircase, for further use in other programs, but also to extend your own catalogs by exporting objects.
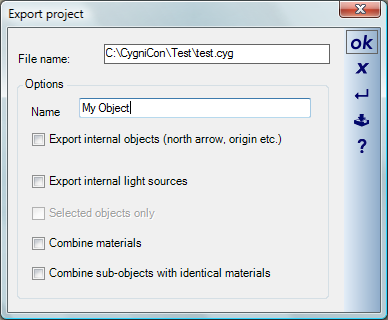
Apart from settings for visibility, you are also offered, once the file name of the object to be saved has been specified, a range of options which affect, amongst other things, the way an object later behaves.
Using the feature for multiple selection, by clicking on several objects one after the other while holding down the shift key, one or more objects, including furnishings, can be chosen for export. Once the objects have been selected, they can be exported using the ‘selected objects only’Option.
‘Combine materials‘ makes the editing of exported objects in other programs easier.
Even more important is the option, ‘Combine sub-objects with identical materials’. If for example, you have a room with four walls which you save as an object, then each side of a wall will be exported as a single sub-object, i.e. in total at least 16 objects. In this case, it would then in fact be possible to subsequently assign different materials or textures to each side of each wall of the resultant object, but this would have to be done at least four times, in order just to assign a new material to the exterior surfaces of the walls. If you know in advance that this feature is not required, you can merge the sub-objects for the sides of the walls on export. All wall surfaces then have common properties which can be changed collectively in the object.

The object is saved with a click on ‘OK’. According to the selected format, all necessary textures are also exported to the target directory. If for example you save a house as a ‘3DS’ object, you will find in the target directory the file ‘Haus.3ds’ and all textures and images that are referred to in the it.
If you save objects in the directory ‘\Objects’, they can be used directly when planning.
Note: available export formats are depending on the version you have purchased